

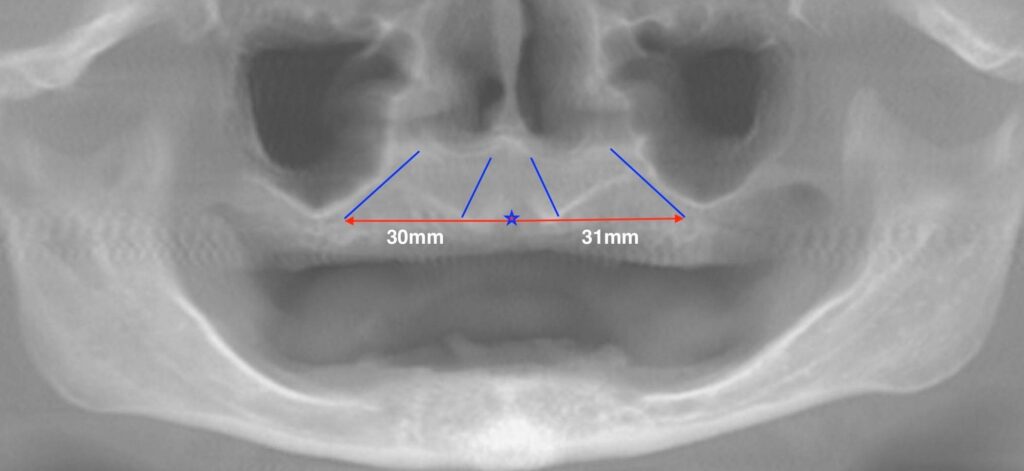
One of the most difficult aspects of treatment planning I encountered when I began doing full-arch surgery, was assessing the edentulous maxilla. Without teeth in place, it was difficult to identify reference points that would correlate to my anticipated A-P spread.
It was challenging for me to know when looking at a pano and CT scan if I should plan a traditional 4 implant AOX case? Or, if I would need additional implants and advanced implant techniques to achieve an adequate A-P spread?
Over the years I have come up with the following technique to quickly assess an edentulous arch via panorex image. This technique provides me an efficient but surprisingly accurate way to initially assess whether a traditional arch will require a 4 implant configuration or more than 4 implants via advanced techniques to achieve adequate A-P spread.
I would like to note that as a clinical rule of thumb (in my hands), I feel that A-P spread is adequate if I have a one tooth or less cantilever. Meaning, my access hole is located at the second bicuspid (or further posterior) for a one molar prosthetic. There are much more technical ways to calculate A-P spread – however, this is simply the “rough estimate”, intra-operative, clinical method I utilize.
So let’s take a look at how how I assess an edentulous pano.
My “Quick Guide” to A-P Spread in the Edentulous Maxilla
First and foremost, in order for this technique to be of any value, I ensure that my CT scanner is calibrated appropriately. Second, I have always preferred a CT system that allows making direct measurements on the panorex image – and being able to do so is necessary for successful utilization of this technique. Unfortunately, not all systems enable this feature.
As shown in the photo above, I take my digital ruler (highlighted here with red arrows for better visualization) and place it on the midline. The ruler position should account for the anticipated reduction. I then measure from the midline to the bilateral planned posterior implant sites.
Once I have that measurement, I use it as a reference against the guidelines below.
The guide below is what I use to help me determine if a traditional 4 implant configuration will be adequate and/or if I need to adapt based on anatomic constraints and look for additional posterior implant sites.
A. 30 mm (or more) from the Midline is Ideal
If I am able to achieve a posterior implant position 30 mm or more from the midline (based on the panorex measurement), I know that I am going to be in a strong A-P spread position with a traditional 4 implant configuration.
Barring unique patient scenarios, I do not plan for additional implants as part of my final restoration (but I always plan for “outs”).
B. 25 mm – 30 mm from the Midline is a “Gray Area”…
If my anticipated poster implant placement is between 25-30 mm from the panorex midline, I know that I’ve encountered a surgical “gray area”.
What I mean by this is that sometimes a traditional 4 implant AOX configuration is adequate, and sometimes additional posterior implants in a more advanced 6 implant configuration may be indicated.
How do I know which is the case?
It’s primarily patient selection.
Is this a 55 year old bruxer, with a strong bite force who wants a true “full arch dentition”? Is this someone who has been in dentures for 40 years and is open to a “shortened arch” as long as they can have something fixed? Is this an 85 year old female with a low bite force and small jaw?
The answers to these questions, as well as the true clinical correlation of access hole position, will dictate the intra-operative decision.
A 4 implant configuration in this “gray area” also depends on the clinical ability of the surgeon to truly “stretch-out” the given bone availability and maximize the A-P spread within those constraints.
C. 20 mm – 25 mm from the Midline: Start Looking…
If the panorex measurement indicates 20 mm – 25 mm, the vast majority of the time I will start looking for additional posterior implant sites. In most patients, improved A-P spread is necessary for the long term health of the prosthetic.
There are rare occasions where you may be able to get away with a “shortened arch” within this measurement (20-25 mm) on certain subsets of patients. This will depend on both your clinical work-up, intra-operative assessment, and most importantly – the patient’s wishes and pre-op discussion.
Furthermore, there are occasionally instances where patients will prefer a shortened arch as they do not want the additional surgery that may be required such as pterygoid or zygomatic implants.
This shortened A-P spread may also be something feasible “temporarily” while grafted sites or buried implants heal, and then the A-P spread is improved at a later date.
D. 20 mm or Less: Additional Posterior Implant Support is a Must.
In this scenario, I feel that additional implant placement is required to be able to provide any type of long term full-arch prosthetic. This level of A-P spread, even in a en elderly patient with low bite force, is just simply insufficient.
There are a plethora of ways to add additional support – but now’s the time to select your preferred tool from your surgical toolbox and get to work!
I hope this “bird’s eye view” of the edentulous maxilla helps simplify your treatment planning and provides you with confidence as you tackle tough cases.
Matthew Krieger DMD
P.S.
For reference, I use the iCAT CT Scanner and have used this brand for the past ~6 years (different versions but same brand). I only have experience using this technique with this system. I have been exposed to some other CT scanners that do not allow this capability and it is very frustrating and a huge disadvantage to the AOX surgeon.
P.P.S.
There are always caveats to everything… Even within these guidelines there is the possibility to treat severely atrophic arches with a measurement of 20 mm or less with only 4 implants using advanced techniques such as zygomatic implants and/or trans-sinus implants etc.
As always, I write these articles based on my experience and my preferences. I do not write in depth about zygomatic implants, as I am not a huge proponent of them. And while I do perform trans-sinus implants, I find that I use them rarely given the other tools and techniques at my disposal. The guide above highlights how I handle virtually all edentulous cases (but there are always outliers).
“Don’t overcomplicate simple things.”
Unknown
Q & A with Dr. K
“Do you give your patients steroids intra-operatively or after surgery?” |
I do not normally provide either intra-op or post-op steroid therapy.
Given that I see a large number of diabetic patients and other immunosuppressed patients, I have moved away from using steroid therapy altogether – except for some rare circumstances where I feel it is indicated for medical reasons (a topic for another day).